Pages

Showing posts with label hat. Show all posts

Sunday, January 5, 2014

The blog lives! Also final Leo dress pictures!

It's been a while!  A combination of busyness and laziness is a good summation of my absence.  But I am happy to report that the Leo dress is done (was done quite a while ago, like the beginning of October...)

A few progress pictures though.  This is the polonaise after all but the facings and back were sewn together, from the back:


Not bad for pattern matching for the first time:


And I even matched up the buttons!  I had to cut into uncut fabric for some of those buttons...


And for the best parts of the outfit (in my opinion) the hat and the stole!  The pin for the stole I got from an antique shop in the St. Charles historic district.


And an above shot of the hat.  I thought I had some shots of the individual pieces being put on the hat, but you can sort of see most of the construction from the top.  The larger feathered area towards the back were just six of the smaller feather pieces bound together, and it's propped up a bit by a couple of net puffs.  There's a net puff in the front and a single feather gather on either side behind it to fill in space.  The fabric pieces were part of the pattern, which is the Lynn McMasters Bustle Hat pattern, View A, I believe.  The net puffs were from another hat version, but I don't think I followed the pattern piece, just the instructions for it.  I got the feathers from Joann's.


And this was the first incarnation of the dress worn at Archon.  I didn't have time to work on my hair switches or skirt trim, but at least the big elements were finished!  Alas, I did not make the gloves.  It was an ebay purchase.  In hindsight, I probably will not get leather that color again, since it's pretty close to my skin color and looks a bit odd if I think that's the skin on my hands...but it goes so well with the velvet stole...


I had a take two with hair switches.  These turned out much better than the original.  I kept them as switches instead of wrapping them around a piece of wire.  Then I sewed them to little wig clips and curled them using Magic Curlers, the mesh spiral curlers.  I just sectioned each switch into several pieces, used the curlers, and dipped them in a pot of hot water, then let them air dry.  No pictures since I was rushing at this point and I needed to get other things done.

Here is the second incarnation of the dress worn at Rural Heritage Day, without the stole but with skirt trim and my hair pieces curled and done.  Thanks to Mary for taking these.  I finally have some decent pictures, and of course since she's a seamstress, she knows where to take pictures to showcase awesomeness.  So here's some nice eye candy for you:


As for the riding habit, that was put on hold since I was having trouble finishing Leo at the time for Archon, and I haven't had a reason to start it up again.  But I had the jodhpurs and shirt done, the jacket partially done (I stopped during the lining stage, so I guess I just needed the collar and lining finished) and the vest still needed to be resized and made.  Maybe I'll have that done early next year.

Future plans?  Pisces is officially underway, and I finished the combination underwear just yesterday (no pictures, as I cannot find my battery charger for my camera...).  I have a petticoat cut out, which I should work on after this, and a mockup for the fantail skirt and polonaise made out of the Truly Victorian Tea Gown pattern.  Normally I wouldn't do a full mockup of a dress, but this one is very specific, so I want all the kinks worked out before I cut into my good fabric.  Speaking of fabric, it was such a pain to find fabric that worked for this project.  I was looking for fish scale/scalloped/fan-shaped patterned fabric in an aqua or turquoise color.  But the ones that I did find, for the longest time, just didn't work or were discontinued or the stores didn't have enough.  I finally found a suitable fabric by accident online, and at first it was a pain to find anything else that matched with it.  But the sewing powers that be finally shined on me, because not only did I find a solid fabric that worked but I also found lace, tulle, and beads as well...and with the exception of the original scaled fabric, which is on the left, I found the rest of it at Joann's, oddly enough.


This probably doesn't make up for almost a half year of lack of updates...but at least you had something pretty to look at, right?

Sunday, March 31, 2013

Fur-filled times with Leo

So I promised Mary that I would start on the hat first for my next Victorian dress.  I got the Lynn McMasters's Bustle Hat pattern in preparation for that.  Since I'm doing Version A and it's so simple, I may make two hats.  I don't know how possible it is to cover a buckram frame with fur, but if it's possible, then I'd like one to be fur for the Leo look and one to be fabric for the regular look.  I decided on fur because Leos are characterized as being high end, best that money can buy type of people.  So I think fur works better in that regard.  This will be my first venture into using fur, so this should be...interesting.  Luckily it's a simple hat and it's only a circle of fur to cover the top of it.

In addition to the hat, I've been messing around with stole and collar patterns.  Yeah, I got a pattern for the collar, just a wide shawl collar from a coat pattern.  I'm lazy, and it was $1.99.  This was after a few days of messing around with other patterns and not getting the result that I wanted, so I've earned my laziness.

In terms of current projects, my Renaissance skirt has the major seams sewn and the smock is cut out.  For some reason it was a pain to alter that pattern, especially it being such a simple garment.  And the bodice...I'm not looking forward to that.  Fitting bodices are such a pain.  But hopefully I can get most of this done before I start Leo.

So hopefully in the upcoming weeks I can get my hat wired and ready to cover (it's only two pieces, so it won't take long) and start the polonaise mockup once I get the pattern for it.  Also I might as well repair my red and black dress before I delve into this new project in May.  The red bled into the white overlay.  Should have seen that coming, but ah well.  I'll just cut off that section and make a chemisette.

Progress pictures to come and such once I finish something...


Sunday, December 30, 2012

My adventures in welt pocket land

I found my NF straw bonnet from earlier this year hiding behind other sewing stuff, and I finally finished up the last few strips on it.  So that's done!  I'll probably use that for Pisces instead of making a new straw hat for it.


So I was a little bored Friday night, and I started reading some of the sewing books I got from the library.  One of them was a sewing guide reference book by Threads (awesome book by the way) and I stumbled across the section on welt pockets.  I've heard people complain about how difficult they are, saw May struggle to make practice pockets galore and still not get it right.  So I decided to try my hand at making one.

Two hours later...

Well, part of the reason it took two hours was because I hand sewed everything except for the stitching on the welts before sewing them on.  Part of the reason why I wanted to hand sew it was because I knew I could have more control on the very precise corners.  That and I ran out of thread on my bobbin and I was too lazy to wind another one.  That too.  Also, my hand sewing for this was more atrocious than usual.  Hints why some thread can be seen.  A bit counterproductive, but...

Verdict?  It's tedious.  No one can say it isn't.  Though there's a certain zen to it (perhaps I'm confusing that with all the hand sewing).  And they look impressive if done perfectly.  Mine wasn't too perfect (It's crooked on the right side!  Grr!), but hey, it was my first time making one.


I also got Period Costumes for Stage and Screen at the library.  A pity it was the 1500-1800 one.  Not my cup of tea time period wise, but I do plan on making working/middle class Renaissance garments eventually, so the chemise and partlet patterns could be useful.  I wonder if it will be more or less difficult jumping from time period to time period and having to figure out your body in comparison to the silhouette you need to have for that period.  Something to think about.

Well, the year will be winding down pretty soon.  Here's to another year of sewing!

Monday, October 15, 2012

The red and black dress, almost done!

As I was packing up my stuff for sewing class tonight, I thought, "Man, I have enough stuff done that I can actually wear almost all of it!" So I packed up everything and got dressed during class. So here's some pictures!

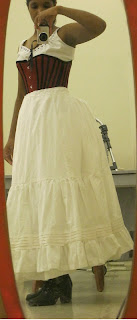
Me in my proper undies (finally!)  The ribbons at the bottom of the drawers aren't necessary, but I put them there back when I was making plans for other outfits that might include shorter skirts or breeches.


Me with my bustle petticoat and an additional petticoat on (see, I'm wearing more than one petticoat!  I'm learning!)


And finally, two pictures of the whole dress (sans jacket buttons, but I rather like the look of it without it...and it may be a bit of a stretch to acutally fasten those buttons, so I may not even try).  Also my hat!  My hat isn't done yet.  I plan on adding a draped portion in the back and (hopefully) roses, but a simpler hat for this dress won't be so bad if I can't get the flowers to work. 
 
But first, the original inspiration fashion plate, for frame of reference...


And my dress!
 

I apparently can't wear stuff without it being crooked...I'm looking at you, lapels and overskirt.  Speaking of the overskirt, thought you can't see the back, it's not bustled, just constructed "wrong."  The instructions say not to gather or pleat excess fabric in the back otherwise the back won't look right.  But I did anyway because there was so much fabric to take up in the waist, so I made several large knife pleats towards the center back, and between that and the side pleats, it created its own loose bustled look.  And yeah, it did mess up the original bustled design, so don't do what I did if you like the original look.  It just makes the back look like a crumpled mess.


That side view...oh man.  I'm super proud of this dress, you guys.  I didn't realize how awesome it looked until I put it all on tonight.  Normally it just looks like a lump of fabric on the couch, but now it's a dress.  And I really think the blouse part makes it, that deliberate breaking up of all the red and black.  I'm glad I decided to carry that through to other things as well. (the bag has a white tie, and the parasol, due to things out of my control, happens to have a white frame...and I may make white and black flowers for the hat).

So, what's next?  Let me get all this done first!

Tuesday, October 2, 2012

It's starting to come together!

It's been, what, a week and a half?  I've gotten a lot done!  And I have tons of pictures!

Corset's completely done.  I'm not flossing it because if those bones have any room to twist in those channels, I'm burning the darn thing because it must be possessed.  Also, it's time consuming, and I'm having to do enough hand sewing at it is.  So here it is!  Which doesn't look much different other than binding!


My bodice is in its final stages.  The jacket and vest portions are done, and they just need to be sewn together.  I also need to put a collar on it (my addition) and trim and sew on the sleeves.  So not too much, considering.  It's a great pattern, like all the TV patterns are.  But if you hate hand sewing, especially facings, this pattern is not for you.

So here's the inside of the jacket:


And here's a vest panel with a faux blouse overlay.  Yeah, I used a serger.  I didn't buy the machine for it to collect dust.


I cut out my jacket tonight.  I was thinking about lining it, but I honestly don't have any lightweight fabric I'm willing to sacrifice.  So it looks like this will just get facings too.  Here's a couple of pictures of the mockup:


 Pretty much I took the TV Early Bustle day bodice, made the ease adjustments (there's a topic on it on the TV forums) and lengthened it about 12in.  I also flared out the bottom for the front and side and put pleats at the center back and the back/side back seams.  I just copied it from the TV Talma pattern, so I think it's 2in cut out (so it's 3in once sewn up).  If I really wanted to, I could button it almost all the way down, but I've seen a lot of jackets that button to slightly below the waist, so I'll keep it that way.

My hat is actually pretty far along.  I changed the design so that it's closer to the fashion plate inspiration.  After making a second mockup, I looked at it and thought "Why doesn't this look right?  Why can't the back look like the front?"  Well, duh, just make it that way!  So I changed that, made the crown a bit taller and the brim a bit wider.

Pictures of the frame


And what I have covered so far (just this evening!) with the fabric tucked under so you can see the curve of the crown better.


And as an added bonus...I pulled out my dress I wore to my friend's wedding just to prove that it can indeed fit over a bustle...with room to spare!  Princess seam polonaise anyone?


Okay, after croping and resizing all those pictures...time to go to bed!

Tuesday, September 18, 2012

A hat? And it's not at the last minute?

Buttons are on the skirt.  Final strips are on the overskirt and it just needs a waistband and closures.  Boning for the corset and bodice is in the mail.  Jacket pattern is (hopefully) done, though it may have to be shortened due to lack of fabric.  And my greatest accomplishment, I made a hat.  Pattern.

Well, I made part of a hat pattern, based on the TV hat pattern.  I was going to have to change the pattern anyway because the front of the hat was too narrow for my big head, apparently, even with the hat tilted forward.  So I thought, in my ambitiousness, why don’t I alter it some more?  So I took the TV hat pattern as a basis for the crown, altered it so the bottom arched upwards on the sides, and used an oval brim instead of the brim for the original pattern.  I wanted something a little different than the hat I already made but simple enough that I could do it with not that much skill.  Then I saw this fashion plate (the hat in the middle) and thought it would be doable.


So this is my interpretation of that, but with a short crown, since the larger one (the regular crown) just looked silly on me.  If I think that crown looks weird, I don’t know what I’m going to think of myself wearing a skyscraper of a hat for a late bustle dress!


One side is different than the other because I was playing around with the curvature of the crown, so it’s a bit lopsided in the front.  Man, making a hat pattern, even from an existing one, is a pain.  I’m going to have to do it again eventually, especially for my zodiac dresses, but hopefully I’ll have a better library of hat patterns to work with by then.

I may at least cut out the brim and start sewing on the wire while I’m at the beauty shop tomorrow.  Which reminds me that I need to start playing around with my hair switches to figure out what I’m going to do with them.
 
Oh, and here’s a quick picture of my skirt and overkirt that I took before above stuff was finished and I did a trial run of the bustling in the back.  I just look at that picture and it feels heavy...


That's all for now!  Hopefully I'll have an almost completed bodice and corset to show you by next week!