Pages

Thursday, October 18, 2012

Sleeves, Round Three!

I was telling my sewing teacher about the little cheat that Mary told me about putting in sleeves, and she just stared at me for a moment—which meant that she didn’t agree with it.  Then she said that extra fabric is what’s allowing my arm to move and told me to put on the bodice (this was when I was planning on putting on my full dress anyway) and see how it fits.  No point in redoing it if it didn’t affect the fit.  When I realized that it did restrict my movement in an already restrictive garment, she demonstrated how I’m supposed to handle tricky fabric that won’t ease well.  She told me if I try once and it doesn't work, I might as well do this and not try the other method again:

1. Stitch a line within the seam allowance from one end of the sleeve cap to the other (or the upper sleeve for a two piece sleeve).  Don’t use your longest stitch, the stitch you use to baste/gather.  Use the one down from that, so that the gathering is more controlled.

2. Gently pull on the thread to start gathering a little bit, but not enough that it would produce tucks if sewn.

3. Stand up your tailor’s ham so the smaller end is up, then drape the sleeve cap over the ham to similate its placement on your shoulder.  Press, with steam if your fabric can handle it.

4. Using a basting stitch and stitching just shy of the actual width you’re supposed to sew (usually 5/8” but for the bodice it’s 1/2”) stitch the bottom part of the sleeve as you would anything else.  Ease the upper sleeve.  As you stitch lightly tug on the thread as you go in small spurts.  Essentially this and the pressing/steaming draws up that pesky ease that you’re left with at the end.
 
Now, when my teacher did this, the sleeve wasn’t perfect.  The sleeve cap was a bit puffy, and there was one small tuck.  But by the time I stitch where I’m supposed to stitch, easing out that tiny part, and pressing, the sleeve will be fine.  The one I tried didn’t look so hot…but I’ll take small tucks that are easily eased out than a huge pleat at the end any day!  It's the difference between redoing a couple of inches and redoing the entire sleeve cap or sleeve.
 
She told me that this is actually a couture technique, which is probably why I’d never heard of it before, but it makes sense.  I love learning and using couture techniques.  Some of it is tedious, to be sure, but it makes the garment that much more beautiful when you're done.
 
It's getting down to the wire, and of course now I start to get sick.  Probably just a cold.  'Tis the season.  But still, I need to press onward.  Especially since it looks like it's going to be colder than I expected and I may need to make a head covering.  Tempting to focus on that and not finish my hat since I'll wear one or the other, but the forecast could change.  It could rain, which means that all of this was for naught since I'm not slogging through the mud in my new dress.  Not happening.  Please no rain?  It would literally make my day.

Monday, October 15, 2012

The red and black dress, almost done!

As I was packing up my stuff for sewing class tonight, I thought, "Man, I have enough stuff done that I can actually wear almost all of it!" So I packed up everything and got dressed during class. So here's some pictures!

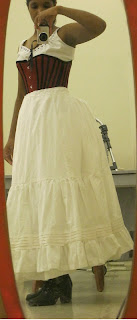
Me in my proper undies (finally!)  The ribbons at the bottom of the drawers aren't necessary, but I put them there back when I was making plans for other outfits that might include shorter skirts or breeches.


Me with my bustle petticoat and an additional petticoat on (see, I'm wearing more than one petticoat!  I'm learning!)


And finally, two pictures of the whole dress (sans jacket buttons, but I rather like the look of it without it...and it may be a bit of a stretch to acutally fasten those buttons, so I may not even try).  Also my hat!  My hat isn't done yet.  I plan on adding a draped portion in the back and (hopefully) roses, but a simpler hat for this dress won't be so bad if I can't get the flowers to work. 
 
But first, the original inspiration fashion plate, for frame of reference...


And my dress!
 

I apparently can't wear stuff without it being crooked...I'm looking at you, lapels and overskirt.  Speaking of the overskirt, thought you can't see the back, it's not bustled, just constructed "wrong."  The instructions say not to gather or pleat excess fabric in the back otherwise the back won't look right.  But I did anyway because there was so much fabric to take up in the waist, so I made several large knife pleats towards the center back, and between that and the side pleats, it created its own loose bustled look.  And yeah, it did mess up the original bustled design, so don't do what I did if you like the original look.  It just makes the back look like a crumpled mess.


That side view...oh man.  I'm super proud of this dress, you guys.  I didn't realize how awesome it looked until I put it all on tonight.  Normally it just looks like a lump of fabric on the couch, but now it's a dress.  And I really think the blouse part makes it, that deliberate breaking up of all the red and black.  I'm glad I decided to carry that through to other things as well. (the bag has a white tie, and the parasol, due to things out of my control, happens to have a white frame...and I may make white and black flowers for the hat).

So, what's next?  Let me get all this done first!

Friday, October 12, 2012

And I thought the parasol was bad...

I have reached the point in a project that no seamstress likes.  The part of half finished projects and things you've been putting off or had to put off because other things had to be done first.  When inspiration has pretty much fled and you're left finishing what your imagination started.  When laziness and sloppiness start becoming less of a cardinal sin and more of a "I need to get this done so shortcuts are necessary" frame of mind.  Using stitch witchery on the jacket facings instead of handsewing it all is sounding very good at this point...

Things have been slow and fairly steady, though the past couple of days have been extremely frustrating due to one thing: sleeves.  If you want to ruin my day, tell me to sew sleeves.  Then I'll probably just cry as I rip out stitches.  Again.

This one I totally blame the fabric.  I'm no pro at the whole easing in the sleeve cap fullness, but I've done it before, between bodices and mockups, at least five sets of sleeves smoothly and successfully, and this is the same type of sleeve as the rest of them.  It doesn't make sense that I can do this over half a dozen times and not get close.  So either I'm going to have to sacrifice the smooth sleeve for a slightly gathered one or alter the sleeve cap.  Which I don't know how to do and I'm surely not going to do it on my final sleeves.

But other than the sleeves, the bodice is 95% done other than a little seam finishing on the sleeve cuffs and two buttons for the jacket part.  The skirt finally has closures.  And the jacket still needs facings and top of the bustle pleats tacked down, buttons, and sleeves.  I'm just going to put the sleeves fiasco garments away for now and focus on the overskirt and hat, the last two things that need to be done/pretty close to being done.  And hopefully I'll be able to fully dress up for sewing class before the 27th.

I have fifteen days to finish this, and I've been working on something every single day, regardless if I wanted to or not, for at least the past few weeks, maybe longer.  It will get done...I hope...

Tuesday, October 2, 2012

It's starting to come together!

It's been, what, a week and a half?  I've gotten a lot done!  And I have tons of pictures!

Corset's completely done.  I'm not flossing it because if those bones have any room to twist in those channels, I'm burning the darn thing because it must be possessed.  Also, it's time consuming, and I'm having to do enough hand sewing at it is.  So here it is!  Which doesn't look much different other than binding!


My bodice is in its final stages.  The jacket and vest portions are done, and they just need to be sewn together.  I also need to put a collar on it (my addition) and trim and sew on the sleeves.  So not too much, considering.  It's a great pattern, like all the TV patterns are.  But if you hate hand sewing, especially facings, this pattern is not for you.

So here's the inside of the jacket:


And here's a vest panel with a faux blouse overlay.  Yeah, I used a serger.  I didn't buy the machine for it to collect dust.


I cut out my jacket tonight.  I was thinking about lining it, but I honestly don't have any lightweight fabric I'm willing to sacrifice.  So it looks like this will just get facings too.  Here's a couple of pictures of the mockup:


 Pretty much I took the TV Early Bustle day bodice, made the ease adjustments (there's a topic on it on the TV forums) and lengthened it about 12in.  I also flared out the bottom for the front and side and put pleats at the center back and the back/side back seams.  I just copied it from the TV Talma pattern, so I think it's 2in cut out (so it's 3in once sewn up).  If I really wanted to, I could button it almost all the way down, but I've seen a lot of jackets that button to slightly below the waist, so I'll keep it that way.

My hat is actually pretty far along.  I changed the design so that it's closer to the fashion plate inspiration.  After making a second mockup, I looked at it and thought "Why doesn't this look right?  Why can't the back look like the front?"  Well, duh, just make it that way!  So I changed that, made the crown a bit taller and the brim a bit wider.

Pictures of the frame


And what I have covered so far (just this evening!) with the fabric tucked under so you can see the curve of the crown better.


And as an added bonus...I pulled out my dress I wore to my friend's wedding just to prove that it can indeed fit over a bustle...with room to spare!  Princess seam polonaise anyone?


Okay, after croping and resizing all those pictures...time to go to bed!