Pages

Sunday, December 30, 2012

My adventures in welt pocket land

I found my NF straw bonnet from earlier this year hiding behind other sewing stuff, and I finally finished up the last few strips on it.  So that's done!  I'll probably use that for Pisces instead of making a new straw hat for it.


So I was a little bored Friday night, and I started reading some of the sewing books I got from the library.  One of them was a sewing guide reference book by Threads (awesome book by the way) and I stumbled across the section on welt pockets.  I've heard people complain about how difficult they are, saw May struggle to make practice pockets galore and still not get it right.  So I decided to try my hand at making one.

Two hours later...

Well, part of the reason it took two hours was because I hand sewed everything except for the stitching on the welts before sewing them on.  Part of the reason why I wanted to hand sew it was because I knew I could have more control on the very precise corners.  That and I ran out of thread on my bobbin and I was too lazy to wind another one.  That too.  Also, my hand sewing for this was more atrocious than usual.  Hints why some thread can be seen.  A bit counterproductive, but...

Verdict?  It's tedious.  No one can say it isn't.  Though there's a certain zen to it (perhaps I'm confusing that with all the hand sewing).  And they look impressive if done perfectly.  Mine wasn't too perfect (It's crooked on the right side!  Grr!), but hey, it was my first time making one.


I also got Period Costumes for Stage and Screen at the library.  A pity it was the 1500-1800 one.  Not my cup of tea time period wise, but I do plan on making working/middle class Renaissance garments eventually, so the chemise and partlet patterns could be useful.  I wonder if it will be more or less difficult jumping from time period to time period and having to figure out your body in comparison to the silhouette you need to have for that period.  Something to think about.

Well, the year will be winding down pretty soon.  Here's to another year of sewing!

Wednesday, December 5, 2012

It is intellectually challenged, not a dummy

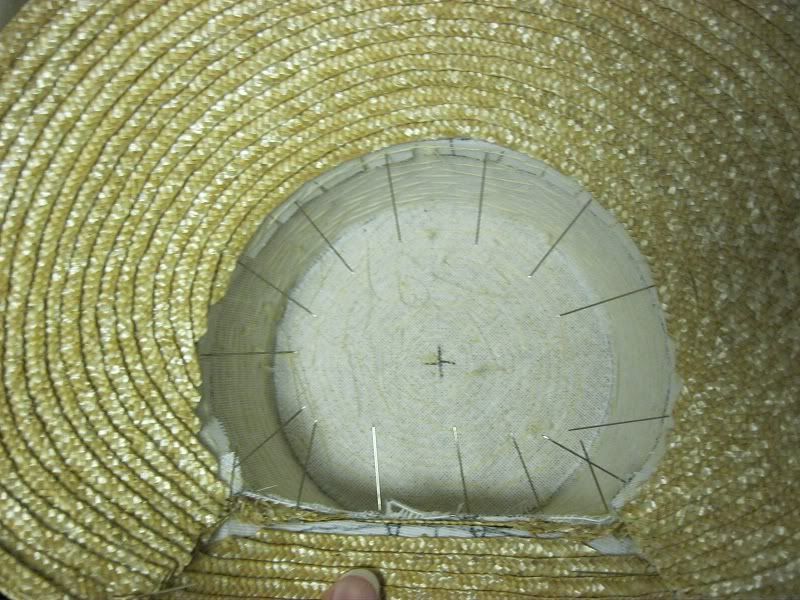
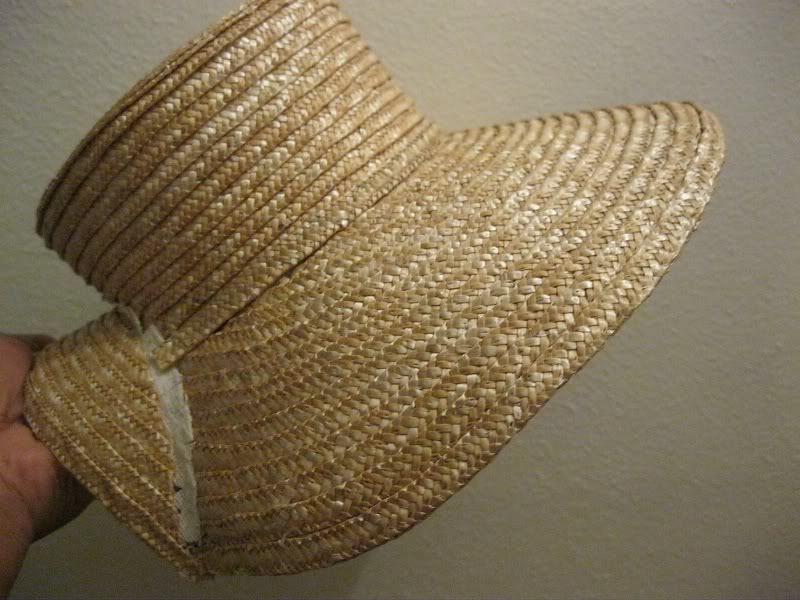
I haven’t posted in over a month, so I might as well post…

Over the past couple of weeks for sewing class, we’ve been making duct tape dress forms.
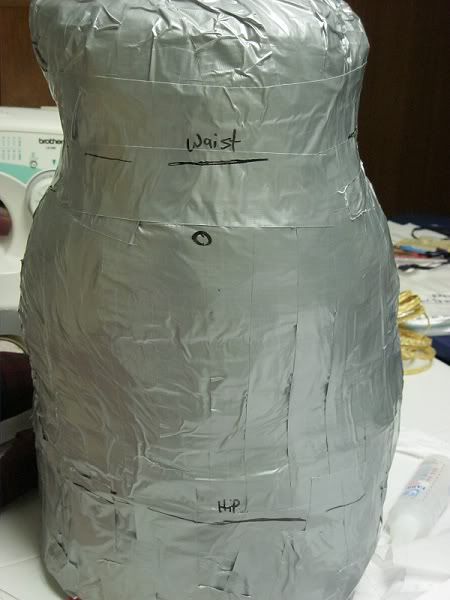
  Normally, if everything goes right, it would have only taken those two weeks.  But May and I each had some patch work to do on our forms.  We used the duct tape as a mold and filled it with batting and spray foam, then covering it with the usual jersey fabic.  During the drying process, my form decided to settle at the waist, compressing my poor breasts and squashing my midsection.  So, after we tried pulling at the duct tape to see if it will straighten on it’s own…we ended up cutting me in half.  I mean it in half.  Magic trick jokes ensued.

I’ve been very slow on my petti progress, partially because of Thanksgiving, mostly because of my wrist.  I’m not looking forward to gathering six widths of fabric.  Though I may leave it short for future shorter dress applications.  I know Pisces will need it.

Speaking of Pisces.  And Sagittarius.  I’ve been making plans for these dresses pretty much over the course of this year, when I got the idea to do it for Your Wardrobe Unlocked.  I won’t be able to obviously, but the idea still stuck.  The plans for the specifics keep chaning except that Pisces will be Natural Form and Sagittarius will be Late Bustle.  The former because of the fantail skirt, the latter should be pertty obvious.  Huge bustle.  Horse’s hindquarters metaphor.  You get the idea.

Fabric?  This is what I have planned to use for Pisces.  I also plan on using a complementary solid color as well. (This is a major close up, FYI.  The pattern's not this big).


The back of the fantail skirt will be cut in the shape of a fish tail.  I may gather it to that look, which was my original plan, or just cut the shape.  Either another layer and/or the balayeuse will be of the original pattern’s size.  Also, I plan on having the fabric of the left and right sides going in different directions, the same as most pictures of Pisces (glutton for punishment, I know, I know).  The rest of the design keeps changing, but I hope I have the final incarnation this time.
 
With Sagittarius I plan on using the gold version of the fabic I used for the dress I made last summer for the wedding, along with a plum sateen and the white sateen I used for my red and black dress.  I love the tailored look of Late Bustle dresses.  It’s really the only thing I’ve seen that feels like my personal aesthetic.  I’ll be using Truly Victorian’s Tail Bodice (guess why?) and altering the front of it.  I may make it like the red and black with different fronts for the vest and jacket, or I may just cut away the front and form the vest that way.  We’ll see what I feel like doing at that point.  What I'm more concerned about is fashioning my own archery equpiment since I can't use a real bow or real arrows if I want to wear this dess to conventions (and the dress doesn't make sense if the archery stuff isn't there).  So plan on some DIY fails learning curve with that.
 
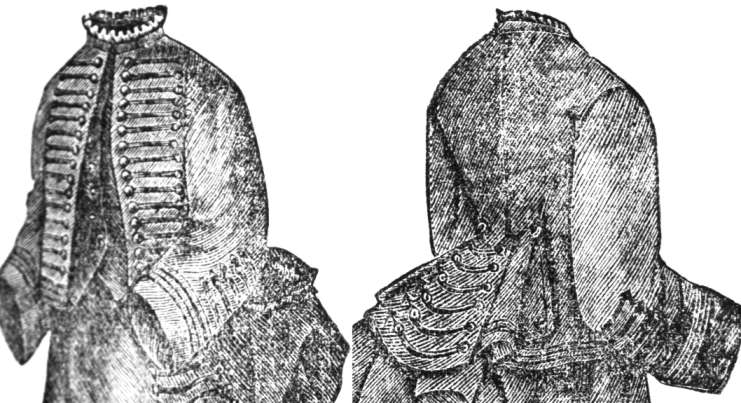
Some more eye candy for you…this baby is the reason why I instantly decided to put off my military project.  From De Gracieuse, 1873:


Can’t you just imagine that in black wool and gold trim?  And the cords!  The I don’t know if I would use black or brown fur, but…come on.  I have to make this with that outfit.  No question. 

Oh, here's the site for the De Gracieuse.  Like you need another reason to look at pretty clothing all evening...

http://www.geheugenvannederland.nl/?/en/collectieindex/modetijdschrift_de_gracieuse/gmdh01_jaar
 
So yes.  Some things to think about when I can start up a project again.  I'm also picking away at the designs for other  zodiac dresses as well.  I'm excited about Scorpio the most, but it's also the most complex.  Trying to fashion a scorpion's tail out of a fantail skirt isn't easy and will require some major hardware back there.  Somehow.
 
Pictures to come when my dress form is complete, and I may hang some stuff on it to take more pictures of stuff I didn't get a chance to photograph.

Thursday, November 1, 2012

Red and black done! And future plans

After battling sinus crap for a week and most of those days doing well to get four hours of sleep, I did manage to finish my dress, somehow, in time for Rural Heritage Day.  I had a blast.  Unfortunately I only had a chance to take one picture (not of myself) but fortunately it's of two dresses Mary made for this year, so I'm glad I have a personal picture of those:


Yesterday I got dressed up again and walked around the Botanical Garden for a while.  A nice trio took a couple of pictures for me (after they took pictures of their own of course).  So here it is, my finished dress, which I left in the original size since, come on, that background.  We're talking about the Garden here:


The only thing I don't have pictured is me in my jacket, which I don't have a picture of anywhere, but there should be time to put that on at some point.  It's a plain jacket, so I'll be wearing it again.

Oh, and here's my big bun bun I wore.


Remember those hair switches from my very first post?  Yeah, finally used them.  I used one switch for the inner braid and three for the outter.  Made a pretty huge bun, but that's pretty period.

So that's over and done with.  What's next?  Well, I'll be taking a big project hiatus and just working on petticoats for a little while.  I have 18 yards of muslin in the mail that will get turned into more than likely bustle pettis, and maybe a Natural Form one too.  Get the stuff done that gets put off, and then you never have enough pettis!

As for future big plans, I hope to get started on my zodiac dresses next year, starting with Sagittarius and Pisces, depending on which fabric I get first and whether or not I have a dress form made at that point (Pisces NEEDS it for what I have in mind).  The military dress will be put off because I have much much grander plans for it, and I'll need a ton of wool for it.  Which isn't cheap, as we all know.  But if I'm going to make a military dress, I need to use wool if I'm going to do it right.

So between making the petticoats and participating in National Novel Writing Month, that'll take me through the end of the year.  I haven't mentioned that I write? *stares at bio* Yes I did.  Writing is my old school obsession.  About fifteen years in fact.  Nine of which have been dedicated to one novel series.  Man, it's been that long?  Really?

Anyway.  Here, enjoy some pretty fall shots of the Japanese Garden.  Click for full size awesomeness!


Thursday, October 18, 2012

Sleeves, Round Three!

I was telling my sewing teacher about the little cheat that Mary told me about putting in sleeves, and she just stared at me for a moment—which meant that she didn’t agree with it.  Then she said that extra fabric is what’s allowing my arm to move and told me to put on the bodice (this was when I was planning on putting on my full dress anyway) and see how it fits.  No point in redoing it if it didn’t affect the fit.  When I realized that it did restrict my movement in an already restrictive garment, she demonstrated how I’m supposed to handle tricky fabric that won’t ease well.  She told me if I try once and it doesn't work, I might as well do this and not try the other method again:

1. Stitch a line within the seam allowance from one end of the sleeve cap to the other (or the upper sleeve for a two piece sleeve).  Don’t use your longest stitch, the stitch you use to baste/gather.  Use the one down from that, so that the gathering is more controlled.

2. Gently pull on the thread to start gathering a little bit, but not enough that it would produce tucks if sewn.

3. Stand up your tailor’s ham so the smaller end is up, then drape the sleeve cap over the ham to similate its placement on your shoulder.  Press, with steam if your fabric can handle it.

4. Using a basting stitch and stitching just shy of the actual width you’re supposed to sew (usually 5/8” but for the bodice it’s 1/2”) stitch the bottom part of the sleeve as you would anything else.  Ease the upper sleeve.  As you stitch lightly tug on the thread as you go in small spurts.  Essentially this and the pressing/steaming draws up that pesky ease that you’re left with at the end.
 
Now, when my teacher did this, the sleeve wasn’t perfect.  The sleeve cap was a bit puffy, and there was one small tuck.  But by the time I stitch where I’m supposed to stitch, easing out that tiny part, and pressing, the sleeve will be fine.  The one I tried didn’t look so hot…but I’ll take small tucks that are easily eased out than a huge pleat at the end any day!  It's the difference between redoing a couple of inches and redoing the entire sleeve cap or sleeve.
 
She told me that this is actually a couture technique, which is probably why I’d never heard of it before, but it makes sense.  I love learning and using couture techniques.  Some of it is tedious, to be sure, but it makes the garment that much more beautiful when you're done.
 
It's getting down to the wire, and of course now I start to get sick.  Probably just a cold.  'Tis the season.  But still, I need to press onward.  Especially since it looks like it's going to be colder than I expected and I may need to make a head covering.  Tempting to focus on that and not finish my hat since I'll wear one or the other, but the forecast could change.  It could rain, which means that all of this was for naught since I'm not slogging through the mud in my new dress.  Not happening.  Please no rain?  It would literally make my day.

Monday, October 15, 2012

The red and black dress, almost done!

As I was packing up my stuff for sewing class tonight, I thought, "Man, I have enough stuff done that I can actually wear almost all of it!" So I packed up everything and got dressed during class. So here's some pictures!

Me in my proper undies (finally!)  The ribbons at the bottom of the drawers aren't necessary, but I put them there back when I was making plans for other outfits that might include shorter skirts or breeches.


Me with my bustle petticoat and an additional petticoat on (see, I'm wearing more than one petticoat!  I'm learning!)


And finally, two pictures of the whole dress (sans jacket buttons, but I rather like the look of it without it...and it may be a bit of a stretch to acutally fasten those buttons, so I may not even try).  Also my hat!  My hat isn't done yet.  I plan on adding a draped portion in the back and (hopefully) roses, but a simpler hat for this dress won't be so bad if I can't get the flowers to work. 
 
But first, the original inspiration fashion plate, for frame of reference...


And my dress!
 

I apparently can't wear stuff without it being crooked...I'm looking at you, lapels and overskirt.  Speaking of the overskirt, thought you can't see the back, it's not bustled, just constructed "wrong."  The instructions say not to gather or pleat excess fabric in the back otherwise the back won't look right.  But I did anyway because there was so much fabric to take up in the waist, so I made several large knife pleats towards the center back, and between that and the side pleats, it created its own loose bustled look.  And yeah, it did mess up the original bustled design, so don't do what I did if you like the original look.  It just makes the back look like a crumpled mess.


That side view...oh man.  I'm super proud of this dress, you guys.  I didn't realize how awesome it looked until I put it all on tonight.  Normally it just looks like a lump of fabric on the couch, but now it's a dress.  And I really think the blouse part makes it, that deliberate breaking up of all the red and black.  I'm glad I decided to carry that through to other things as well. (the bag has a white tie, and the parasol, due to things out of my control, happens to have a white frame...and I may make white and black flowers for the hat).

So, what's next?  Let me get all this done first!

Friday, October 12, 2012

And I thought the parasol was bad...

I have reached the point in a project that no seamstress likes.  The part of half finished projects and things you've been putting off or had to put off because other things had to be done first.  When inspiration has pretty much fled and you're left finishing what your imagination started.  When laziness and sloppiness start becoming less of a cardinal sin and more of a "I need to get this done so shortcuts are necessary" frame of mind.  Using stitch witchery on the jacket facings instead of handsewing it all is sounding very good at this point...

Things have been slow and fairly steady, though the past couple of days have been extremely frustrating due to one thing: sleeves.  If you want to ruin my day, tell me to sew sleeves.  Then I'll probably just cry as I rip out stitches.  Again.

This one I totally blame the fabric.  I'm no pro at the whole easing in the sleeve cap fullness, but I've done it before, between bodices and mockups, at least five sets of sleeves smoothly and successfully, and this is the same type of sleeve as the rest of them.  It doesn't make sense that I can do this over half a dozen times and not get close.  So either I'm going to have to sacrifice the smooth sleeve for a slightly gathered one or alter the sleeve cap.  Which I don't know how to do and I'm surely not going to do it on my final sleeves.

But other than the sleeves, the bodice is 95% done other than a little seam finishing on the sleeve cuffs and two buttons for the jacket part.  The skirt finally has closures.  And the jacket still needs facings and top of the bustle pleats tacked down, buttons, and sleeves.  I'm just going to put the sleeves fiasco garments away for now and focus on the overskirt and hat, the last two things that need to be done/pretty close to being done.  And hopefully I'll be able to fully dress up for sewing class before the 27th.

I have fifteen days to finish this, and I've been working on something every single day, regardless if I wanted to or not, for at least the past few weeks, maybe longer.  It will get done...I hope...

Tuesday, October 2, 2012

It's starting to come together!

It's been, what, a week and a half?  I've gotten a lot done!  And I have tons of pictures!

Corset's completely done.  I'm not flossing it because if those bones have any room to twist in those channels, I'm burning the darn thing because it must be possessed.  Also, it's time consuming, and I'm having to do enough hand sewing at it is.  So here it is!  Which doesn't look much different other than binding!


My bodice is in its final stages.  The jacket and vest portions are done, and they just need to be sewn together.  I also need to put a collar on it (my addition) and trim and sew on the sleeves.  So not too much, considering.  It's a great pattern, like all the TV patterns are.  But if you hate hand sewing, especially facings, this pattern is not for you.

So here's the inside of the jacket:


And here's a vest panel with a faux blouse overlay.  Yeah, I used a serger.  I didn't buy the machine for it to collect dust.


I cut out my jacket tonight.  I was thinking about lining it, but I honestly don't have any lightweight fabric I'm willing to sacrifice.  So it looks like this will just get facings too.  Here's a couple of pictures of the mockup:


 Pretty much I took the TV Early Bustle day bodice, made the ease adjustments (there's a topic on it on the TV forums) and lengthened it about 12in.  I also flared out the bottom for the front and side and put pleats at the center back and the back/side back seams.  I just copied it from the TV Talma pattern, so I think it's 2in cut out (so it's 3in once sewn up).  If I really wanted to, I could button it almost all the way down, but I've seen a lot of jackets that button to slightly below the waist, so I'll keep it that way.

My hat is actually pretty far along.  I changed the design so that it's closer to the fashion plate inspiration.  After making a second mockup, I looked at it and thought "Why doesn't this look right?  Why can't the back look like the front?"  Well, duh, just make it that way!  So I changed that, made the crown a bit taller and the brim a bit wider.

Pictures of the frame


And what I have covered so far (just this evening!) with the fabric tucked under so you can see the curve of the crown better.


And as an added bonus...I pulled out my dress I wore to my friend's wedding just to prove that it can indeed fit over a bustle...with room to spare!  Princess seam polonaise anyone?


Okay, after croping and resizing all those pictures...time to go to bed!

Thursday, September 20, 2012

Parasol woes...

There is always something, I suppose, the one thing that makes me want to throw something across the room and let loose a curse word.  Or twenty.

For my first Victorian project, it was the bag.  More so because it was something simple.  You wouldn't think a drawstring bag would give me so my grief.  But really it was my overuse of fabric that made it so difficult, since I had to take it apart and trim away part of the top section's interlining to fix it.  Turned a simple probject into a hassle, especially since it was a day or two away from when I needed it.

This project?  The parasol.

Now, I realized after I painstakingly stitched on twelve strips that you aren't supposed to sew on trim before the cover is sewn on the frame.  Surprise, that wasn't the issue at all.  Haven't had one stitch pop.  No, the problem is the cover itself, which is too small for the frame.  As in, I can't sew the middle section of the spokes (or whatever techical term it is) without snapping the threads that are holding the end.  This was all after I broke a needle and got sliced up by a pin so well that it would have made a knife proud.  So I'm really at a lost as to what I can do.  I may not even have enough fabric left to trim the parasol at all.  I don't hate parasols.  They're a tad bit of a pain because of the now sewing trim on first thing, but other than that, they're fine.  But this one...This one makes me dislike it more than hats and corsets.  And that's bad.

Conversely, my little bag/reticule went together fairly smoothly.  Because of my skirt trim fiasco, I ended up having two leftover triangles from that, so I used that as the base for the bag.  It took about an hour, and all it needs are ties.  Picture later because I don't know where my camera is and if it's in my sewing room, I'm not going back down there until my parasol apologizes for being MEAN.  Or maybe I should blame the fabric.  It's probably the fabric's fault that it can't stretch enough.  Well, either way, that's what's going to have to change.

Whine, whine, whine, I'm putting that aside and working on my bodice tomorrow.

Tuesday, September 18, 2012

A hat? And it's not at the last minute?

Buttons are on the skirt.  Final strips are on the overskirt and it just needs a waistband and closures.  Boning for the corset and bodice is in the mail.  Jacket pattern is (hopefully) done, though it may have to be shortened due to lack of fabric.  And my greatest accomplishment, I made a hat.  Pattern.

Well, I made part of a hat pattern, based on the TV hat pattern.  I was going to have to change the pattern anyway because the front of the hat was too narrow for my big head, apparently, even with the hat tilted forward.  So I thought, in my ambitiousness, why don’t I alter it some more?  So I took the TV hat pattern as a basis for the crown, altered it so the bottom arched upwards on the sides, and used an oval brim instead of the brim for the original pattern.  I wanted something a little different than the hat I already made but simple enough that I could do it with not that much skill.  Then I saw this fashion plate (the hat in the middle) and thought it would be doable.


So this is my interpretation of that, but with a short crown, since the larger one (the regular crown) just looked silly on me.  If I think that crown looks weird, I don’t know what I’m going to think of myself wearing a skyscraper of a hat for a late bustle dress!


One side is different than the other because I was playing around with the curvature of the crown, so it’s a bit lopsided in the front.  Man, making a hat pattern, even from an existing one, is a pain.  I’m going to have to do it again eventually, especially for my zodiac dresses, but hopefully I’ll have a better library of hat patterns to work with by then.

I may at least cut out the brim and start sewing on the wire while I’m at the beauty shop tomorrow.  Which reminds me that I need to start playing around with my hair switches to figure out what I’m going to do with them.
 
Oh, and here’s a quick picture of my skirt and overkirt that I took before above stuff was finished and I did a trial run of the bustling in the back.  I just look at that picture and it feels heavy...


That's all for now!  Hopefully I'll have an almost completed bodice and corset to show you by next week!

Friday, September 14, 2012

Quick update this week

This week is the week of doing the little things I've been putting off for a while.  Like putting closures on my drawers, hemming my chemise, and sewing the strips onto the back of my overskirt.  I also spray painted my parasol frame (which was a bit of a fiasco, but it turned out okay).  So nothing really interesting this week to photograph other than my bodice mockup, which now has buttons so I can actually try it on:


Fun fact, I'm not wearing a corset under that.

So next week I'll dive into some of my bigger projects, starting with my jacket pattern.  It felt so much like fall today that I'm itching to start it.  And other than lengthening the darts, my bodice is ready to cut out once I prep my white fabric.  Let's get stuff done!

Monday, September 10, 2012

Corset in a week? Sure, why not!

Okay, so it's not 100% done...but if I had my boning now, It would probably have part of the binding on it.  So like the skirt, it's almost done.

Pictures first, rant second

Front and back of corset before boning channels (oter than the back) and waist tape were sewn on:


The corset front with the basted channels...


And how it looks after finishing up this evening!


I would have tried to take a picture in it...but it seems as if my chemise has mysteriously gone missing...

This is my second real corset and the first corset I've made with external boning channels.  Sewing them on is a pain, but I do like the effect.  I'd like to thank my lovely Loop Pressing Bars for all those strips.  Simple gadget but awesome.

Other than basting before sewing on the channels, I don't really have any secrets.  It's still a miracle to me to put a corset together and have it even close to being even in the back.  Out of everything that I've done, corsets are the least fun.  It's a necessary evil and the one thing that holds me back in finishing Victorian dresses because everything depends on it.  I'd totally do a quid pro quo deal with someone if they'd make my corsets for me.

Well, at least it's something almost done.  I count that as a victory.  Now to work on the bodice, and the overskirt, and the hat, and the parasol...

Saturday, September 1, 2012

Skirt=done! Well, 95% done!

So I've been sewing for 2 years, roughly.  The fact that I'm even doing this type of stuff is pretty ambitious for someone so new at sewing in general.  So I feel as if most days, I'm doing very well for myself.  Then I make a mistake so amateurish that it makes me think if I'm ever going to just stop making stupid mistakes.

Like for this skirt.  In the previous pictures, you saw that the trim design is in intervals, which meant I had to do a lot of math to make sure that it was even all the way around.  Guess what I forgot?  That the skirt is A-line, and therefore measuring the hem was not even close to the same measurement as the 12in up that the trim was to be sewn to.  As in, about a 16in difference.

Cue two hours of measuring the skirt between that point and the hem to make sure the trim would be even somewhere, pinning, and trying to stitch down this behemoth.

Cue two more hours of measuring how much to cut off, cutting off three inches from the top of the skirt, gathering the back as tight as possible (not easy with this weight of fabric) and putting in several darts to take up the HUGE excess, measuring, remeasuring, and finally putting on the waistband.

A lesson, boys and girls: double check your math.  Furthermore, double check your math in the correct place.  I never thought I'd be done with this thing.  Good thing it turned out the way I wanted to in the end.

So without further ado, pictures of the dress I took yesterday in the sewing classroom.  Still needs eyes (I got bored and sewed on the hooks) and buttons on top of each triangle along the top strip, which is why it's 95% done.


The corset was also cut out yesterday, and this evening I'm working on making the external boning channels.  Hopefully I can get everything but the boning, binding, and flossing done this week.  Keep your fingers crossed...

Friday, August 17, 2012

Skirt trim progress and pictures!

I had a burst of energy to work on sewing tonight, so I spent the past few hours catching up on Project Runway and tackling the trim for my dress.  I had already cut out the individual pieces last week, but I haven't done much with it since then.

I started a black strip motif on the overskirt, and I wanted to carry that into the skirt trim as well.  Apparently this dress should be called "glutton for punishment" because I wanted two strips on each triangle.  All eighteen of them.  Most of the time tonight was spent on finishing just two of them.  But for all of the learning curve I somehow tackled tonight, I do have pictures on the process.

I gave each triangle a half inch seam allowance, so I pressed and stitched down the slanted sides first, leaving the stright side alone, for now.  One negative thing about working with twill like this is that it doesn't like to stay down, so it actually looks better stitched down.  There's a ton of visible stitching going on in this dress, so what's a bit more?  It's either that or kill my hands slipstitching.  I'm sorry, I'm not THAT anal.  And as my sewing teacher said, if someone is that close to notice, then you better be married to them or about to be married to them.

Next, the strips.  I needed the strips in a chevron, so I found it easier to cut on the bias the opposite way I wanted the chevron to go (so after you stitch, you end up with the seam allowance being a triangle, not a...trapezoid?).  It's easier to press and easier to trim.

So here's what the triangle looks like with both strips stitched down:


I'm still having problems concealing the little extra fabric at the points.  I just kinda tucked it back against the fold line.  Any suggestions for that would be appreciated, since I have, ugh, sixteen more to go for this.

Another thing I was having a problem with (again, due to the bulkiness of this fabric) is the strip at the top of the main part of the trim.  I first did seperate strips, but it was murder to press and still didn't work out.  So I had to use the same method as all the other stuff and sew a strip of red onto the black fabric.  I swear, if I can't sew perfectly straight boning channels by the end of this, then there's no hope for me.  Oh, and I'm using just the regular foot, not a zipper foot.  Better results that way.

So this is a small part of how the trim will look:


Oh, and here's a shot of the overskirt trim.  If you notice up close, the strip closest to the hem is more wrinkled.  That's what happened when I used the zipper foot


And a bit of a surprise for you!  I have a picture that my sewing teacher sent to me of my modern red and black dress.  It's not a great picture, but you'll get the gist of it.  No front shot though, so I'll see if she can send me a shot of that too.  You will notice I am in heels.  Yes, that's a big deal, because the next time I wear heels will be, one, if someone else I know gets married, or two, I get married.  Neither of those things are in the foreseeable future, so enjoy that while you can.  Also, isn't that black piping SEXY?


There.  Now you can't say I never show you pictures.

Wednesday, August 1, 2012

Long time no post, but I have been working on stuff

Yeah, I know, it's been a while.  I don't have any pictures yet of my red and black modern dress (mostly because someone else took pictures of me, so they're on someone else's camera/iPad/whatever.  Pictures will hopefully come for that.

With that dress in mind, I learned a few things:
  • Piping needs to be 1/8" wider on each side (so 1/4" wider).  I took into account the allowance for the cord width but not the cord circumfrence, so my 5/8" piping was only 1/2", which messed up seams, which meant I ended up with an extra inch of room in the end.  So yeah, tiny things like that are important.
  • The way they wanted me to attach the front and back shoulder seams don't work with piping.  Pretty much it had to be done by hand after the facing front and back and the outter fabric front and back were sewn together.  More work, but it was worth it.
So yeah, I would recommend this dress.  I'd take some width off the hem (I took 2" off of each side except for the back seam) but other than that, it was a nice dress pattern to work with.

Onto more Victorian things, I have started my red and black dress.  Progress is slow because my wrist has been on the fritz, but I do have the skirt sewn except for the side seam and waistband, and the overskirt is cut out and the side pleats are basted.  The bodice mockup is in the works, and I'm trying to find a way to alter my glove pattern since my fingers are longer than the original's.  I plan on using the leftover black sateen for the gloves and trim, if I have enough, since that will be more cooperative than making 1/2" strips of black twill.  Plus it will be a nice contrast.

I'm basing the design off of the lavender dress in this fashion plate:


I won't be putting in ALL of the stripes, and it looks like based off of my practice run, the pleats on the skirt trim may not work well with the fabric I'm using, so I may just use the triangle motif and run with that.

I think a lot of my time, like with the modern dress, will be cutting and making bias strips for trim...which I really should get started on so I can finish the overskirt.  But if (I hope) there aren't any fitting problems with the bodice or the corset (yeah, I need to put some boning in it, but it looks like it'll work this time) this project shouldn't take nearly as long as the first one.  I'm improving!

Pictures to come when I actually make something interesting...

Sunday, June 24, 2012

Future plans, and a new pattern!

One of my costuming friends, Mary Gode, was ever so kind enough to give me the newest Truly Victorian bodice pattern as a gift (thanks again, Mary!).  Everyone was gushing over this new bodice, and I was no different.  I had been trying to figure out a way to make a pointed vest and jacket bodice since the Rejected Dress, and both the military dress and the Sagittarius dress require vests (the latter a faux vest).  This new bodice pattern gives me a template for that, and I couldn't be happier.  So the red and black dress will now be Early Bustle instead of Natural Form.  Don't care as long as I can make something pretty out of the fabric!

Speaking of Sagittarius...yes, that's my huge project I was talking about.  I plan on making a Victorian dress for each sign of the zodiac.  Eventually.  More to come on that.

So, after I get done with my dress for my friend's wedding, I'll be working on my corset, then this dress.  I've been submerged in Natural Form and recently Late Bustle designs, so I need to switch gears for Early Bustle again.

Speaking of my modern dress...it's getting close to being done.  That is if I don't decrease the width of the hem, which I more than likely will.  The hem is huge, since it's a circle skirt.  As in, it's about 155in long.  In comparison, my bustle skirt is about 115in or so.  Because of this, and because of the longer back, I decided to pull out my bustle and put it on underneath this dress.  You would think the dress was made for bustle wear.  This has inspired me to possibly make my own polonaise in the future, since that's what it looked like.  Interesting.  A pity I don't have my camera, otherwise I would have taken a picture.

Now, I need to be good and get some work done and not go on another hunt for fashion plates...

Wednesday, June 13, 2012

Another hobby challenger is approaching!

The mockup for the modern dress is more or less done.  I didn't take any pictures of it because it's a pinned mess due to fitting issues at the armhole, which may just have to do with using too stiff of an interfacing for that particular fabric.  I'll also have to raise the neckline an inch or so.  It's fine if you just look at it, not so much when I bend over, and since I'll be cutting and serving the cake at the wedding, bending over is gonna happen at some point.  But other than that...the dang thing FIT, first time, no adjustments other than cutting a 12 bust and 14 waist.  I'm starting to have a tiny bit of faith in commercial patterns.  A little.

FYI, this is the fabric I'll be using, along with solid black sateen:

http://www.quiltknit.com/assets/images/fabrics/rk10991-91.jpg

As a comparison, it's a complement to Kaufman's Ultra Sateen, but I think the site said it's a bit lighter weight (I couldn't tell when I felt the fabric at a local store).  Gorgeous sheen, and it's something I'd equally use for dressier modern and Victorian dresses alike.

So other than washing the fabric, I can't do much else this week.  But I'll be occupying myself with making a trial run of (part) of Vicky's wedding cake.  Did I mention I decorate cakes as a hobby too?  For almost four years now.  Well, scratch that, I used to.  My wrist probably won't hold up too much anymore for that since I hurt it from repetitive use at my previous job which, appropriately, involved a lot of decorating.  But I'll still make cakes, and this is the third wedding cake job I've done for friends, but it's the first "traditional" tiered cake (which is why I'm doing it--I need practice).  I may post some pics of previous stuff if I decide to make a cake post.

So after the dress and the cake is done...back to the corset.  I measured it, and it should work this time.  If I'm still not happy with the shape of the bustline, I can always use the bust gores from the Laughing Moon pattern.  My next corset I'll try bust and hip gores, but right now, I'd just like a corset that fits.  Ah, if only everything we tried to sew fit us like a glove every time.  Sewing would be so much more enjoyable...

And because I'm a tease...I've been working on sketches for a huge Victorian project that will more than likely span over several years, depending on inspiration, time, and funds.  It's not one dress but several.  And that's where the archery stuff in previous posts comes from.  But I've pushed that idea back to next year in lieu of another dress in the project.  It involves fish.  I'm being overly vague.  If you can figure it out from that, then that's pretty impressive.

To bed, then tomorrow I'll start the cakes!

Monday, May 28, 2012

And now for something completely different...

Modern clothing!  I know how to sew modern clothing?  Oh wait, the Project Runway thing.  Yeah.  Made a suit.  Still sitting in my sewing room, unworn since I did a final fitting for everything.

But even then!  This is the first time making a modern dress.  One of my best friends, Vicky, and her boyfriend Thad are having a commitment ceremony in July, so I wanted to make a dress, now that I have the sewing skills to do so.  But since it's less than a couple of months away, I wanted to keep it relatively simple.  I'm a jeans and t-shirt type of gal, so I'm not going to wear tons of frills in loud colors for modern clothing.

I fell in love with McCall's 6504 when I first saw it in the catalog, so I decided on that one, the type the model is wearing with the longer back.  I'll be making it out of dark red and black sateen, but the exact design is still in the works.  I'll need time to do a mockup anyway, so I have some time to decide.

In Victorian sewing news...I don't remember if I said I made a mockup of the Truly Victorian corset.  I did, and it didn't work in any way,shape, or form, so I redrew the pattern today after a few week huffy sewer hiatus.  That usually happens for corset and bodice mockups, unless I'm on a deadline.  But I'll see if I can get that done too before mid July.

But for right now...I'm feeling lazy and I'm stuffed from barbeque, so I'm going to go veg.  Sewing can come later.

Sunday, April 29, 2012

Undies and Accessories

So what have I been up to? A few things.

I had mentioned archery gloves in the last post, so I did a muslin mockup of my right hand (which looks like a three fingered glove). First time sewing gloves! It wasn't too difficult, and with just a running stitch, I was able to finish it in an hour or two. They're too big, but I'll be making more changes to it later on, so it wasn't a waste of time.

I've also did a duct tape gaiter pattern courtesy of Festive Attyre. Super simple, just sacrifice a pair of old stockings, put it over your botted feet and however tall you want the gaiters to be, and then take pieces of duct tape (not a long wrap like a mummy) and wrap up your leg and the part of the boot you want to cover. The hard part? Cutting it off your leg! The instructions are here.

Drawers are done except for a drawstring, and the chemise needs a few tweaks in fit before all it needs is insertion lace and a ribbon at the collar. I am going to suck it up and by the TV corset pattern, since we all know it takes a bit of time to get a good fit on a new corset pattern, so I want all that fitting done long before anything else gets started. I may order that next week. And who knows? I may be convinced to apologize to the Rejected Dress and finish it. I'm feeling slightly generous. That or I need a historical dress because the one I'm working on I want more free reign of creativity.

So what else do I need to work on? Gaiters, bustle pad, hat (at least the buckram frame of it) and depending on whether or not I finalize yay or nay for the leather thing, I can work on some of the archery accessories if I use the faux leather I already have. We shall see.

Friday, April 13, 2012

"Listen to your creative gut" is the moral of this story

This is what happened to my first Victorian project. I had planned on using a steampunk jacket pattern for it because I loved the look of it. But my mind started tugging at me. Pretty soon I wanted to change this and change that about the pattern, and it was apparent that my mind kept pulling at me so much that it was saying "this isn't what you want to do" from the beginning. So I made a plain bodice instead, my mind eased, and I was happy with the end result.

The tugging is happening again with this military outfit.

I realized I was trying to shoehorn this outfit into something that it's not, and I've narrowed my view of it to the point that I'm not inspired by it anymore. So one of two things needs to happen. Either scrap the military outfit all together (which I don't want to do) or find something else for DPP and do the military outfit the way I want to do it, without having to shoehorn it into "steampunk."

So. We're back to square one, ladies and gentlemen. Then late last night I came up with a tenative plan. I want to keep it a secret for now, but it does involve archery.

So what about all the plans I've made for the other outfit? I can actually still use a lot of it. The breeches and gaiters could still be used. I plan on making partial gloves in the form of archery gloves (And perhaps put plate armor pieces on the fingers? We shall see.) Nothing else has been bought or done, so I'm not backpedaling much.

And see? My mind's at ease again, so this was the way to go.

But Andrea, you might be wondering, what happened to the yellow and lavendar dress? Don't. Just. Don't. That dress is very very lucky I haven't started a fire in the barbeque pit and burned it. I'm through with it. It's not worth my time. Which means that along with a steampunk look, I also have to make a few pieces for the regular Victorian stuff this year. Oddly enough, the colors I'm working with will be dark purple and gold. The color family continues to haunt me!

Saturday, April 7, 2012

I was going to make a crown pun...

But I'll spare you. I'm finished with my practice run of the crown!

Photobucket

It turned out better than expected, though as you can see, there's fuzz from the interfacing. I'm going to have to figure something out with that. I don't want to draw the design directly on the fabric, but I can't have that fuzz...especially since I intend to have this either on a black or red background.

In the end, I didn't find an acceptable way to do the monogram, so I either need to find another, plainer font, or something not as thin. Trying to make tiny horizontal stitches is difficult. I had a more successful time with all those tight curves in the crown. I developed a method for it.

First, I mark off the starting point and some guidelines so I can see where the stitches need to "flow" so to speak.

Photobucket

Then I start filling in the gaps. For tight turns, I go into the same hole on the inner curve side but continue as normal on the outter side.

Photobucket

Depending on the tightness, I may go in the same hole one or two times, but no more than three, otherwise it starts becoming bulky. Not sure if that's the correct way, but it turned out all right.

I'll tackle the final draft later with lettering and all, but now my sights are set on gloves. I got the Butterick glove pattern (because I'm too lazy to make my own, so it's worth the 99 cents) and the pattern's cut out and ready to go.  I may work on that this weekend, but I really should get the rest of the Project Runway stuff done.  Still haven't done the final steps in a couple of things.  So I'll focus on that before I immerse myself into handsewing these gloves.

How very fitting I'm doing all this hand sewing when I'm teaching a mini lecture on that very subject on Monday for sewing class.  I'm the unofficial hand sewing expert (yeah right).  Turns out that blind hemming and slip stitching have more variations than I thought...and I've been doing one of them "wrong" from the beginning.  Well, my logic is the same way with the above curve thing: I do something by trial and error, and it works, so I don't bother going the pro's way.

It's almost 2:30.  Let me get to bed.

Thursday, April 5, 2012

So it begins...

I've been starting on prep work for the military outfit. Monday evening I quickly realized that the original Victorian pattern for the vest and jacket was horribly out of proportion. Luckily, I have a already-fitted Truly Victorian bodice and both volumes of Fashions of the Gilded Age at my disposal, so between those two, I think I can come up with something that looks like the original design.

I've also been looking into gloves. I'll be making military dress gloves, and while I'm not sure the modern pattern was used back then, they did have gloves that buttoned at the wrist, so that's a start. I'll save my sanity and buy a pattern for that.

And tonight I started something I wasn't planning on doing: embroidery.

The thought came up some night this week in the wee hours of the morning that I should do some insignias or what have you, like uniforms do, like patches that denote rank or what branch of the military they're in. So I decided to do (hopefully) two things, a royal seal and a royal cypher. What is a cypher? A monogram basically, and I've seen it used for the royal family in Britain on various things. So since that was simpler, I started on that first.

I am a cross stitcher, but I'm not embroiderer. So this trial run is looking shoddy at best, but I wanted to see if I could do it.

I started with just tracing my printed out design onto tear away interfacing used for machine embroidery:

Photobucket


Then I (attempted) to satin stitch. I used gold cross stitch thread and dark red sewing thread. After an hour's worth of stitching, here's what I have so far:

Photobucket

As I said, shoddy. I'm sure it will get better as I go along. The royal cypher always ends in R for Rex or Regina. I chose to use the initial of the family name of the monarch rather than the given name since royal families in this particular place aren't so boring with the naming of their heirs, so they have cyphers to honor the entire lineage, not just one monarch. I decided.

I may break my vow of "don't buy anything that isn't mandatory" and get the glove pattern next time it goes on sale. I want a lot of the tedious work done first, and I do need these gloves for this outfit. So that's how it goes.

Friday, March 30, 2012

Project in the future

The supposed end of Project Runway is coming soon, although my sewing teacher hasn't said anything about a real date yet, so my classmate and partner in sewing crime, May, hopes that we get another month...or two. She's working on five different after five dresses, so she has had a much more difficult time at it than me. But what I've seen of it is gorgeous.

In the end, yes, again, I amended my Victorian dress plans. After doing a mockup of the bodice, I decided that I didn't like how my torso looked in my corset, and I want to make a new corset before finishing the outfit. So there's that. The skirt is almost done, though.

So what's next? Actual working on stuff wise, not much. Planning wise...oh, I have plans.

Your Wardrobe Unlock'd, a wonderful resource site with articles for sewing and historical clothing, has a contest every year, and this year one of them is for Steampunk Historical Inspirations, or some combination of those words. So I plan on participating.

I have an idea for a roughly 1874ish steampunk military dress. I am not a huge fan of the brass and leather look, it's just not me, so I'm going more towards "ficticious military uniform" route rather than traditional steampunk. I've been using inspiration from both military outfits of the time and riding habits, some of which were heavily inspired by military outfits. My dress won't be for riding since I want it to be a bustle dress, but I may be convinced to make riding pants as an alternate outfit. Am I getting on a horse? Are you kidding me?

I was planning on starting this next year, but since the contest ends in February of next year, that won't work. So I've been trying to plan ahead for when I do have the funds to buy the things I need for this outfit.

Really the only things I can do now are the mockups for the bodice and hat, undergarments (not my corset yet) and gloves. Well, I'm going to TRY is what I'm saying. We'll see just how good my hand sewing skills are. This project hindges on me learning a lot of new things, all of which can go horribly south and the way of my original plans for the purple and yellow dress. Why can't I do easier stuff? Hello, my name is Andrea, and I'm an overachiever. Nice to meet you.

Saturday, March 3, 2012

Resurrected dress

After a few weeks of no productivity whatsoever, I had a thought. The Victorian dress I abandoned could be revived, but in a different way. I still have six yards of the yellow fabric left to use, which is enough for a skirt and bodice. What I'm going to do (though it pains me to do so) is take apart the pleated skirt and reuse the fabric for the rest of the outfit. I realized a couple of days ago I had no intention of going back to that pleated skirt, and if I don't want to waste a ton of fabric, I need to cut my losses and reuse the fabric in some way.

So this is what I had in mind:

Yellow jacket bodice and purple vest, but the vest will be attached to the sleeves and the jacket body will be an optional overlay. This way the vest can be an optional standalone if my torso gets too hot from the extra layer. The skirt will be yellow with a purple ruffle on the bottom (I've sworn off pleats for a while) and trimmed in some way with any extra yellow fabric I have. The overskirt will also be purple, but I don't know the design yet. That was another reason why the previous project flopped, the overskirt.

This project will also be how quickly I can put this together. I had told myself that I wasn't going to participate in the Project Runway thing anymore, but now one of the new students wants in on it, and I can't just not finish when she's starting from scratch this late in the game. So...can I do this in a month or so? Yeah, probably. It's stuff I've done before, and if I can get a mockup pretty much done in one evening, this bodes fairly well for the rest. I hope.

Monday, February 13, 2012

Back to old haunts

Due to financial constraints from every which way, I've decided to take a hiatus on sewing altogether. So, for now at least, I'm defaulting back to my original drug of choice: cross stitching.

My mom, before we were born and when we were little, was an avid crocheter and cross stitcher. She taught my two sisters and me when I was about eight or nine (still have my first cross stitch stashed somewhere) but I was the only one who stuck with it, and I've been hooked ever since.

So fast forward to high school when, during the summers, I would cross stitch religiously, like it was my job, for four, five hours or more. During school, and throughout college, I didn't have the time, but it was still the one thing that I did on my downtime that truly relaxed me.

Then I got into sewing in 2010, and cross stitching has gone by the wayside, but I pick it up on occasion. At the very least it's made me adept to other forms of embroidery, such as flossing for corsets.

So now I've narrowed my cross stitching niche down to two categories: Asian cross stitches and zodiac/celestial cross stitches, but I'm very very picky about what I do. Currently I have a project in the works for both, a series of small but complex zodiac designs from Julie Hesler's Fantasy Cross Stitch (which I believe is out of print) and "Oriental Lady Beauty" from Joan Elliott's Oriental Odyssey. The latter's easier, so I'm picking away at that now.

No fancy pics and whatnot. Cross stitching's not very photo worthy until it's done anyway!

Sunday, February 5, 2012

In sewing no man's land again...

So, it looks like my lavender and yellow dress is on hiatus. I've been frustrated with it, and the only thing that's going to come of this is (to me) a mediocre finished project. So I'm going to finish tacking the pleats sometime in the near future so the masking tape doesn't leave a residue over time and tuck all of this away until I feel inspired to fix the problems (mostly the overskirt) and start it up again. I do like the design and the colors, so I will finish it someday. Just not right now.

So where does that leave me now? Not sure. I'm low on money right now, so buying a ton of stuff won't do. I do have a red and black Natural Form dress and winter coat planned for fall/winter activities. I'm not inspired by that dress yet except for the bodice. I have a few months yet.

One thing I do intend to make is a simple Rensaissance outfit for the faire in May, so maybe I should focus on that and get my mind off of Victorian stuff for a while. We'll see!

Tuesday, January 31, 2012

Photo dump time!

It's been a couple of weeks since I've updated this...but I've been busy (doesn't feel like it since most of it was slow handsewing). So you, gentle readers, get to see a lot of pictures! Was that from a book, "gentle reader?" Not that that's saying much. I've read how many books?

The big project that I'm almost done with is my straw covered bonnet. The brim took about a week and a half to cover. Then I was struggling to get the bavolet (the curved part in the back) to sit correctly. Turns out the brim and the bavolet was supposed to be connected by wire on the edge before all of this, but that wouldn't have worked at all. So it's a big shoddy at the corners, but for my first bonnet, that'll have to do.

The acursed bavolet. Figured attaching it to the top and covering it with another strip of straw would be best


The inside of the bonnet, since you can't see my stitching anywhere else. All that time...


And the bonnet as it is right now!


I worked on two other things, my pleated skirt and a duct tape dummy. The dummy was...interesting. I had one of my sisters help me, and since I was making this over my waist and hips, there are just some areas that you shouldn't be touching on your sister, so I had to help with pressing down tape. ^_^ I stuffed it with the stuffing you use for pillows and stuffed animals, and newspaper/fabric scraps/plastic bags, putting the stuffing in the middle so the outter wall wasn't as squishy. The waist was too big, so I used a combination of slashing from the top, repositioning, and retaping, and taking a strip of fabric and cinching the waist as much as I could. It's not pretty, but it'll do. Now I just need to make a stand for it...


And finally, my pleated skirt. This one I've been putting off (and working on my bonnet instead) because it's awkward hand sewing. So after I machine stitched the top (it's going to be covered up, so I don't care how it looks) I slipstitched the bottom closed because I want NO movement of these pleats.

A closeup of the slipstitching, since I like detail pictures on how people do what they do

]

After that, I got some tape to reinforce the back. I was thinking of just tacking it to the base skirt, but quickly realized that was more trouble than it's worth, so if I do tack it, it'll be mostly held up by the tapes.

So here's where I am with that:

]

Oh, and bonus, because I was tired of doing all of this crap last Friday, I decided to spend my time in the sewing classroom drafting a basic bodice from Fashions of the Gilded Age. Wasn't expecting much...but it turned out well! And other than ease in the bust and messing around with the armhole and sleeve length, it looks that it might fit!


So yeah. Next project is my bodice mockup, not the drafted one, but the Truly Victorian one. Then fixing the overskirt mockup since I can't get the fit right. I have a lot of work to do before the end of March...